How to Mount Concealed-Stud House Numbers on Stucco, Brick, Stone & Wood
Nothing ruins the clean lines of a custom cast metal numeral faster than a Phillips screw head driven right through the middle of its brushed face. True architectural address numbers eliminate visible fasteners completely by threading stainless or brass mounting pins into blind tapped bosses hidden on the back of every character.
Even if you have never drilled into exterior stucco or brick before, concealed-stud mounting is a straightforward 30-minute Saturday project when you pair the right masonry bit with a full-size paper drilling template. Below is the exact field workflow professional sign installers use to achieve dead-level kerning and rock-solid anchoring across stucco, brick, natural stone, and wood or HardiePlank siding.
Flush Mount vs. Floating Spacer Standoffs: Aesthetic & Practical Trade-Offs
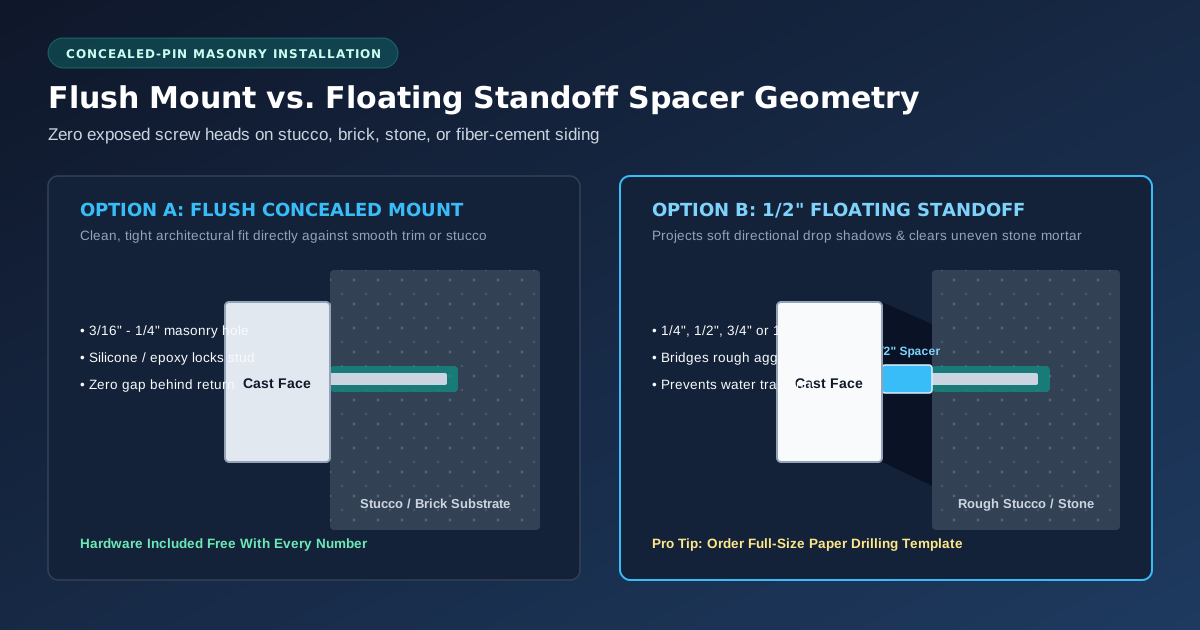
Every cast and cut numeral from ArchitecturalNumbers.com ships with standard threaded mounting studs included at no extra charge, allowing two distinct visual presentations using the exact same wall holes:
- Flush Concealed Mount: The back of the numeral rests directly against the wall surface. Flush mounting looks crisp, grounded, and traditional on smooth painted wood frieze boards, flat architectural concrete, smooth Santa Barbara stucco, and interior suite corridors. Deep-cast styles like Ribbon Deep (
1.50"thick at 6") already project so far forward that flush mounting delivers bold three-dimensional relief on its own. - Floating Standoff Mount (
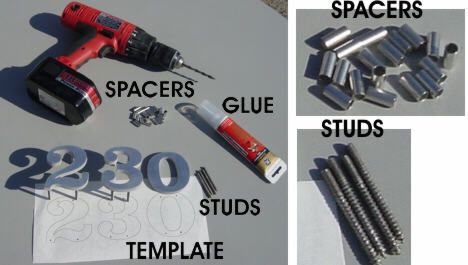
1/4",1/2",3/4", or1"Spacers): Cylindrical spacer collars slide over each threaded pin behind the character, floating the metal off the wall plane. Under sunlight or an overhead porch sconce, floating numbers cast a soft directional shadow onto the wall behind them. Practically,1/2"spacers also bridge uneven split-face stone, heavy dash stucco aggregate, and recessed brick mortar joints so numerals sit in a single flat vertical plane without rocking.
Why the Full-Size Paper Drilling Template Saves Hours of Frustration
Each cast numeral typically has two or three blind-tapped bosses positioned along thicker sections of its stroke so the drill bit never breaks through the face. Because boss locations vary asymmetrically between curved digits like 2, 3, 6, and straight digits like 1 or 4, trying to measure stud centers freehand with a ruler nearly always leads to crooked baselines or drifted kerning.
Adding a Full-Size Paper Drilling Template during checkout in the Sign Price Configurator eliminates layout math completely. We plot your exact address string at 1:1 scale with factory-spaced kerning, baseline alignment crosshairs, and exact drill-center bullseyes for every pin—whether you choose horizontal, vertical, or custom spacing.
Substrate-by-Substrate Drilling & Adhesive Reference
Match your drill bit type, hole diameter, and setting adhesive to your exterior wall cladding:
| Exterior Wall Surface | Recommended Drill Bit | Hole Size & Depth | Pro Installer Technique |
|---|---|---|---|
| Portland Cement Stucco & EIFS | Carbide-tipped rotary masonry bit (3/16" or 1/4" — slightly larger than pin). | 1-1/4" to 1-1/2" deep; use rotary mode (turn hammer off on thin EIFS). | Start in rotary mode so stucco brown-coat does not spall or crater around the hole collar. |
| Clay Brick & CMU Block | Hammer drill with carbide masonry bit. | 1-1/2" deep; drill 1/16" oversized for minor plumb adjustment. | Avoid drilling within 3/4" of brick edges to prevent corner blowouts; blow dust out of holes before gluing. |
| Natural Ledgestone & River Rock | Diamond grit core bit or multi-material carbide bit. | 1-1/2" deep from the highest rock projection; add 1/2"–3/4" spacers. | Dry-fit all pins with spacers first and trim or shim individual pins so every character face aligns coplanar. |
| Cedar, Redwood & Fiber-Cement (Hardie) | Standard twist bit (wood) or carbide masonry bit (fiber-cement). | Drill snug pilot hole (match stud diameter + 1/32") into solid backing. | Seal drilled fiber-cement & wood holes completely with 100% neutral-cure silicone to block moisture wick. |
4-Step Concealed-Stud Installation Walkthrough
Step 1: Thread Pins & Tape the Level Template
Screw the supplied threaded pins finger-tight into the back of each numeral first—never wrench them with pliers, which can mar threads. Hold your full-size paper template against the wall, step back to the sidewalk to verify visual balance relative to porch lights and trim lines, place a torpedo level across the printed baseline, and secure all four corners with painter’s tape.
Step 2: Center-Punch & Drill Through Template Marks
Press an awl or nail point directly through each bullseye cross-mark on the template to dimple the wall surface so your drill bit cannot skate sideways. Remove the paper template (or drill pilot dimples first, then peel the paper away cleanly before full-depth drilling so masonry dust does not tear the layout), drill straight in perpendicular to the wall, and puff out all loose masonry dust using a blow bulb or compressed air can. Adhesive bonds to solid masonry walls, not loose dust.
Step 3: Dry-Fit, Inject Structural Silicone & Slide Spacers
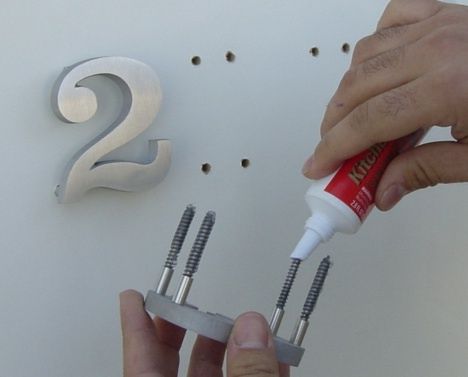
Always dry-fit every numeral into the clean holes before opening your adhesive tube to confirm smooth seating and level alignment. Next, inject exterior-grade 100% neutral-cure structural silicone (or two-part masonry epoxy for heavy 15"–24" bronze commercial letters) into each hole until roughly two-thirds full, coat the threads of each pin lightly, slide your optional 1/2" spacers against the back of the character, and press the pins steadily into the wall.
Step 4: Brace Heavy Characters & Allow Full Cure
Small 4-inch to 8-inch cast aluminum numerals typically stay put immediately in high-tack construction silicone, but bridging a strip of blue painter’s tape across each character for 12 to 24 hours prevents any downward creep while the adhesive cures. Wipe away any tiny bead of squeeze-out immediately with mineral spirits or isopropyl alcohol according to the sealant label.
Ready to Price & Customize Your Own Set?
Select from 38 architectural fonts, heights from 2" to 24", 12 anodized & bronze finishes, or 45+ baked enamel colors—with full-size paper drilling templates available.